If you own a website, you already know how important it is to keep an eye on how your site is performing so that your visitors have the best experience possible.
Thankfully, Google offers tons of free tools that are great resources for gaining more insight about your website.
But you might not have added Google Search Console to your list of invaluable resources from the search engine powerhouse just yet. And you should.
It can assist you in finding out which areas of your site need some work by uncovering errors, SEO information, and more.
All of this can help you rank higher than ever before on Google, which can lead to loads of traffic (and more potential buyers). Who wouldn’t want that?
It can be daunting to learn how to use a new tool. That’s why we created this guide to using Google Search Console to help you get the most out of the software.
First, let’s go over what exactly Google Search Console is and what it can be used for.
Table of Contents
What is Google Search Console?
Google Search Console was created by Google to help webmasters gain insights about their website.
Formerly named “Google Webmaster Tools,” its name was officially changed to “Google Search Console” in May of 2015.
The tool contains various reports that can help site owners fix any errors present on their site and create SEO strategies to boost search engine rankings.
If your site has low rankings and you want to move it higher in search engine results pages (SERPs) to gain more traffic and convert more visitors to buyers, Google Search Console is here to help.
The tool includes four basic sections:
- Search Appearance: allows you to view rich cards, accelerated mobile pages (AMP), structured data, and more
- Search Traffic: includes data about your site’s mobile usability impressions, clicks, internal and external links, and more.
- Google Index: allows you to view information about indexed, blocks, or removed URLs on your site
- Crawl: includes data about crawl errors, crawl stats, errors with URLs, and more.
When Google is having an issue finding or crawling a page on your site (or the entire thing), searchers won’t be able to find it when they are searching for information either.
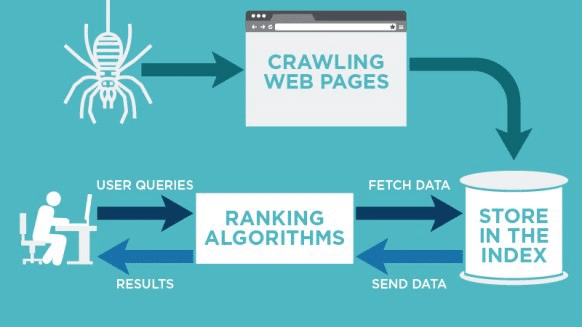
That’s why your top focus when using Search Console should be to make sure that you uncover and fix any crawl or URL errors as soon as possible.
Here’s how to add your website to Search Console.
Adding your site to Google Search Console
To start using the tool to optimize your website, you should begin by signing into your Google account.
Then, head to the Search Console welcome page and enter the URL of your website. Be sure to use the exact same URL that shows up in the browser bar.
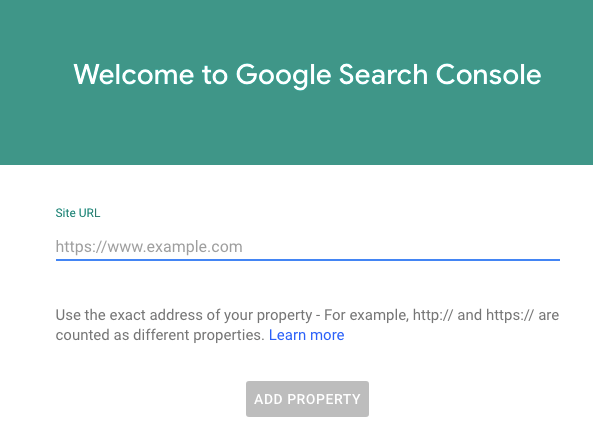
Then, click the “Add Property” button.
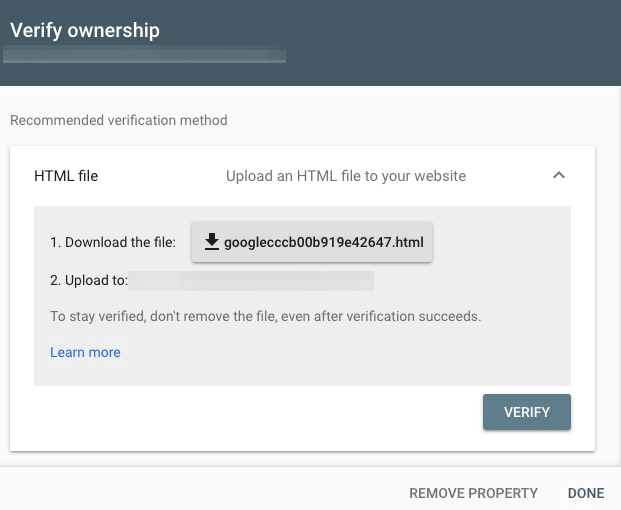
Google will then ask you to choose a way to verify your website.
Since Google Search Console provides access to confidential information about a website, you have to verify that you own that site before you can view any information.
You can achieve this by:
- Uploading an HTML file to your site
- Adding a meta tag on the homepage of your website
- Using a Google Analytics tracking code or a Google Tag Manager container snippet
- Verifying your site via your domain name provider
If your website supports both http:// and https://, you must add the two versions as completely different sites.
Keep in mind that different site domains should also be added separately. (Example: www.blog.mysite.com vs. www.mysite.com)
You may want to link Google Search Console with Google Analytics next.
How to link Google Search Console with Google Analytics
You might think that Google Search Console and Google Analytics offer the same type of information, but they are two different animals.
Google Analytics can give you information about who is visiting your website.
With it, you can view how many visitors you’re getting, how they found your site, how long they were on your site, and more.
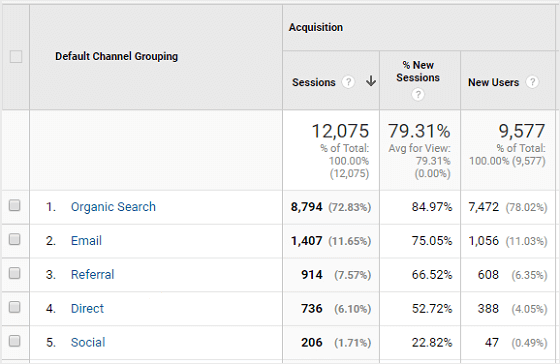
Google Search Console, on the other hand, can help you uncover more technical, internal data, such as who is linking to your site, if there is malware present, and which keywords are causing your site to pop up in search results.
To get the most out of the information that both tools can provide, you can link the two accounts together. This will allow you to integrate data from both tools for more accurate reports.
Once you have added and verified your website in Search Console, click on the website that you want to connect.
Then, click the button that resembles a gear in the upper righthand corner. Choose “Google Analytics Property.”
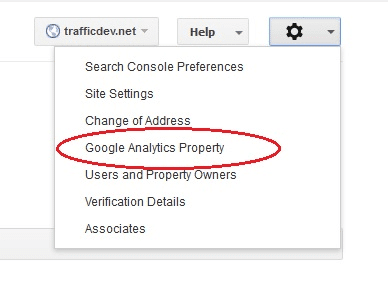
This will direct you over to a list of all Analytics accounts that are attached to your Google account. Choose the Analytics account you want to connect and hit “Save.”
That’s it! Next, you should add a sitemap to make your site easier to crawl.
How to add an XML sitemap
Sitemaps give web crawlers and search engines all of the data they need to find out how your site is organized and what kind of content can be found on it.
These files include metadata that details how often your site is updated, what images and video are used on it, and more.
If your site rarely adds new pages and you want to create a static sitemap, use a tool like XML-Sitemaps.com. All you have to do to create a sitemap is enter in your website’s URL.
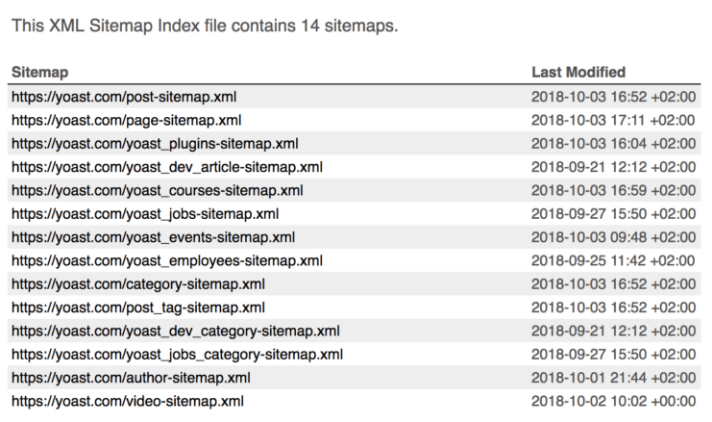
If you use WordPress and the Yoast SEO plugin, they take care of the creation for you though you still have to submit your sitemap index to Search Console.
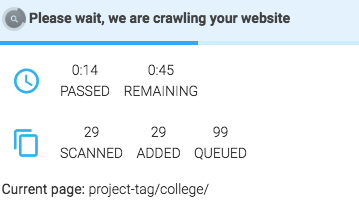
The tool then crawls your site to get a better idea of how it’s structured.
Then, you’ll receive a downloadable XML sitemap file that you can upload to your site.
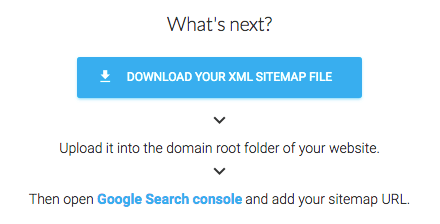
Once you’ve added a sitemap to your website, you should then submit it in Search Console to get insights into how well Google is indexing your pages.
Submitting a sitemap is beneficial because it makes it easier for Google to crawl, index, and rank your site.
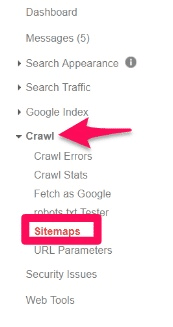
To submit a sitemap, you should first select your site from the Search Console dashboard. Then, click the “Crawl” button. There should be a “Sitemaps” button in that section.
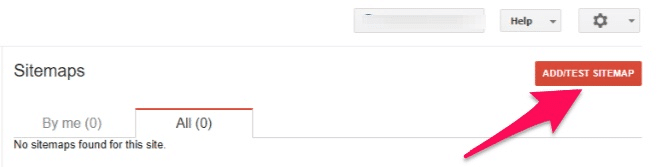
Once you click that button, another button should appear in the upper righthand corner that says “Add/Test Sitemap.”
Clicking that button will bring up a box where you can enter the relative URL for the sitemap.
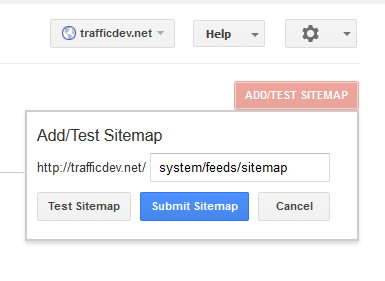
As soon as you click “Submit Sitemap,” your file should be processed immediately.
However, it may take a while for Google to actually crawl every URL listed depending on your site’s size, activity, and amount of traffic.
New Search Console
In the new Search Console, which is the default now, you do it here:

Find out which keywords Google links to your content
Coming up with a great keyword strategy can take your site from drab to fab.
But if you want to know if your SEO efforts have truly paid off, you should check to see which keywords Google links to your content.
Keyword information in Search Console will show you various keywords and keyword phrases that Google associates with your site.
This report can show you issues with keywords on your site, such as a large number of keywords that might not relate to your business or keywords that may have been added to your site via malware or hackers.
You can then use these insights to correct errors or tweak your current keyword strategy to yield more accurate results.
To view this report, click on “Search Traffic” and then “Search Analytics.”
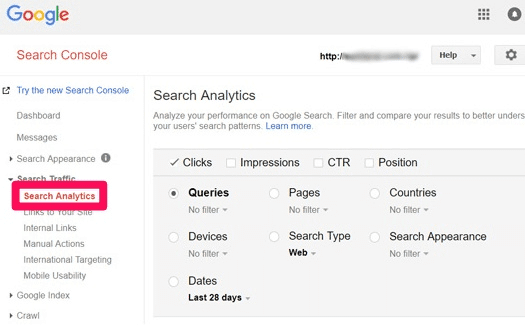
If you scroll all the way down to the bottom of the page, you’ll be able to view all of the keywords searchers are using to get to your site.
Another way to carry out keyword research in Search Console is to click the “devices” button in this same section.
This can help you find out exactly where your site currently ranks on mobile devices, tablets, and desktops.
You can use this data to identify issues with keywords, site speed optimization, and more.
If you come across errors with your site in Google Search Console, it’s best to fix them as soon as you find them to make sure that your site stays in tip-top shape.
Here’s how to fix common errors in Search Console.
Fixing errors in Google Search Console
A Domain Name System (DNS) errors mean that search engines can’t communicate with your server.
This might be happening due to a server that is down, or there could be an issue with the DNS that is routing to your domain.
To check this, use Fetch to view how Google crawls your page. To get to this report, click “Crawl” and then “Fetch as Google.”
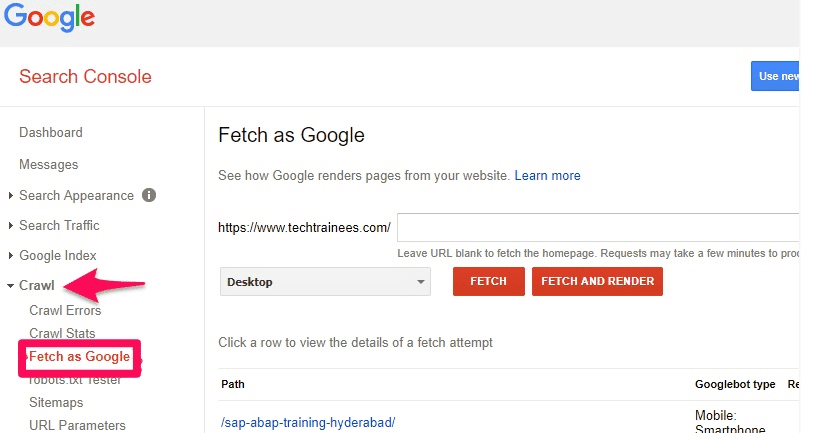
If the tool shows that Google can’t fetch your page correctly, get with your DNS provider to find out what the issue is.
You should also look out for robots.txt errors. Before Googlebot crawls your site, it will attempt to crawl your robots.txt file to find out if there are any pages that you don’t want to have indexed.
If a bot can’t reach your robots.txt file, Google will wait to crawl your site until it can verify whether or not there are any pages that you don’t want to have crawled.
That’s why your robots.txt file should always be available. To fix this, double check which pages that you’ve told Googlebot to avoid crawling.
If your file is correct but you’re still getting errors, check to see whether your file is returning a 200 or 404 error.
Watch for mobile-only URL errors. This kind of error refers to a crawl failure that only takes place on mobile devices.
The most common kinds of mobile-only URL errors tend to be faulty redirects since some websites use separate URLs for visitors on mobile and visitors on desktop.
If this is you, fix it by setting up redirects that send mobile browsers from desktop pages to your pages that are optimized for mobile.
Make it a regular part of your site maintenance schedule to check for errors as often as possible to make sure that your site is free of broken links, malware attacks, or crawl errors that can hurt your SEO.
Conclusion
Keeping tabs on your website’s performance is important.
Google Search Console is a no-cost tool that can help you do just that, with deep insights about your site’s SEO, links, keywords, and more.
You can use it to identify and fix any internal errors that might be present on your site. To add your website to Search Console, simply enter in your URL and verify that you are the site owner.
Some people may think that Search Console and Analytics are the exact same thing, but they’re not.
Analytics is mainly focused on your site’s traffic, while Search Console can provide you with more technical, internal data.
It’s important to connect your Search Console account with Google Analytics so that the insights you receive from both tools are as accurate as possible.
You should also add a sitemap to make it easier for Google to crawl your page. Create a sitemap, add it to your website, and submit it in the “Crawl” section of Search Console.
To ensure that your keyword strategy is at it’s best, use Search Console to find out which keywords your website is ranking for right now.
You should routinely check your site with the tool to make sure that everything is running smoothly.
Fix any errors with your site that you find in Search Console as soon as possible to make sure that your site’s rankings aren’t affected.
Some ways to do this include checking for DNS errors, using Google Fetch to find out how Google is crawling your page, double checking that all of your URLs are active and correct.
Double check that your robots.txt file is working and be on the lookout for mobile-only errors.
Make Google Search Console a part of your regular rotation of site management tools so that you don’t sink in a sea of competition.
