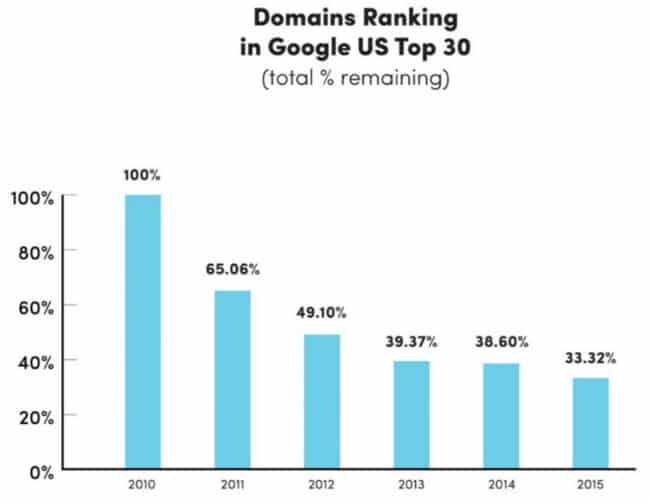
Websites are constantly changing, which means that pages on the internet come and go. As early as 2003, a study found that 2% of the internet was disappearing every week. Another study found that 66.68% of domains that ranked in the top 30 in Google in 2010 were nowhere to be found by 2015.
Because the internet and websites are fluid, content gets lost. If you’re actively working on a website, adding pages and links and new features, then this is happening on your website as well.
This means that, over time, your website will become less and less optimized for search engine optimization (SEO). Even if you were ranking well in the past, content will be pushed down on your site which makes it harder to find, technologies will change and break which cause site issues, and internal links will change because URLs also change.
I was recently investigating an organic traffic decrease here on Credo. I’ve admittedly been very busy with other parts of the business, so I had taken my eye off of our own SEO performance for a while.
When I put my SEO hat on and dug in, I found some easy things to clean up. I also found a major issue with over 1,000 internal links that were passing through redirects.
We’ve made some fairly substantial changes to the site since the start of the year and updated a lot of URLs, so this wasn’t surprising. But it was an issue.
Now that I’ve fixed them, I want to walk you through the steps that I took so that you can also diagnose if this is an issue for your site and then get them fixed.
Let’s dive in.
Table of Contents
Step 1: Crawl Your Site (With Screaming Frog)
First up, you need to crawl your website. My tool of choice for doing this is Screaming Frog, which is a paid SEO tool that I have paid for every year since 2011. They have a free version that crawls up to 500 URLs, so if your site is small you can use that.
Once Screaming Frog is downloaded, opened, and you’ve added your License Key, it is time to crawl your site.
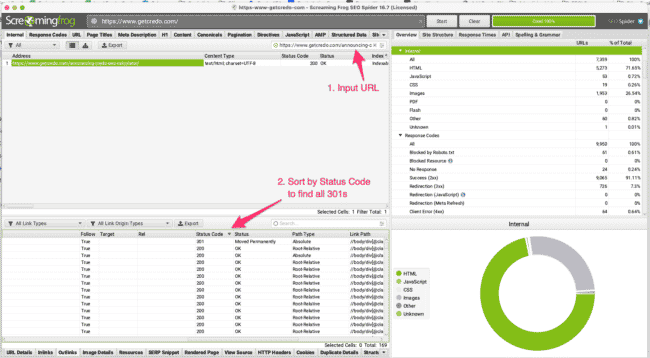
Take your homepage URL (in my case, https://getcredo.com/) and enter that into the URL field at the top, like so:
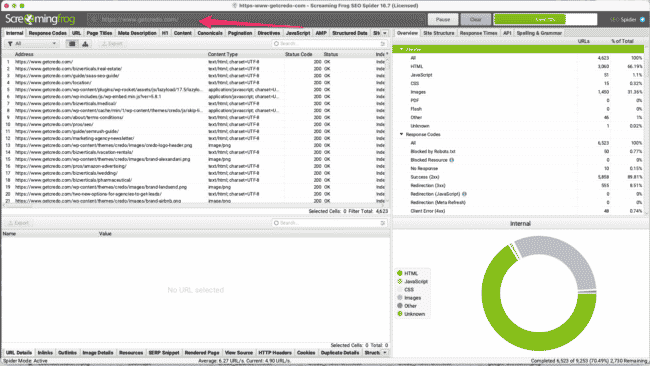
Then click Start, and Screaming Frog will begin crawling your website like you can see above.
This Dashboard will give you a lot of data, but the important views are on the right side where you can see File Types, Response Codes, Duplicate Page Titles, and much more.
We’re going to make use of the filter for URLs with a Redirection (3xx, either 301, 302, or 307) status code.
Step 2: Narrow the Crawl to Your URLs and Redirection Status Codes
Select the “Redirection” option on the right side of the screen, or click the Response Codes tab near the top left of the screen.
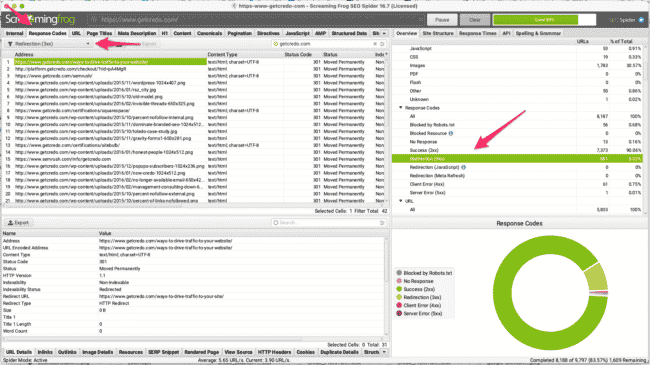
Now you will see a full list of URLs found in the crawl that have a 3xx status code. Hopefully, your site is configured correctly and most are 301 (permanent) redirects, though there may be 302s in there as well.
Depending on your Screaming Frog configuration and if you asked them to not crawl external URLs, you may need to filter down your list to just your domain. To do this, use the filter at the top right of the list of URLs and enter your domain. You can see in the screenshot above that I have done this with “getcredo.com.”
As a note, to ask Screaming Frog to crawl (or not crawl) external URLs, you can navigate to Configuration > Spider > Crawl > External Links and make the appropriate selection.
I like having external URLs crawled, as linking to a lot of external URLs that redirect is also a negative signal to Google that your content may be outdated, but it’s not necessary when specifically looking for internal redirects to fix.
Step 3: Check Inlinks and Redirect URL
Now that you have a full crawl of your site and your list of internally redirected URLs, you can start to untangle the web by figuring out first why you’re linking to internally redirected URLs and then how to fix these issues.
Before you do that, you should know that internal redirects are normal. I will wager that almost every website on the internet has internal redirects.
Whether or not internal redirects are a major problem for your site depends on the scale of the issue. For Credo, for example, internal redirects were about 16% of the URLs crawled. This is a large percentage and thus justified a deep focus to fix. On other sites, there may just be 3–5 internal redirects that could bear fixing, but may not be causing a large SEO issue.
When you find internal redirects, you should figure out two things:
- Where the link originated from, and
- Where the URL is redirecting to.
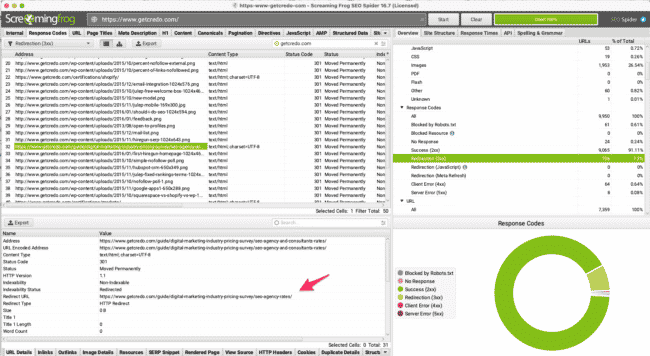
For this, click one of the URLs, then click Inlinks at the bottom. Find where the link originates:
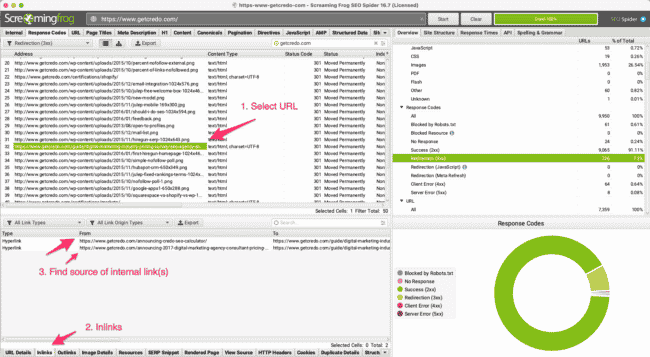
Now click URL details to see where this URL redirects to. This is the final URL that you will want to link to from the pages found on Inlinks.
One tip I learned from Dan, founder of Screaming Frog, is to export all of the redirecting URLs and where the link originates so that you can properly prioritize:
This report is found at ‘reports > redirects > all redirects’.
As Dan said:
This shows the source pages, the url that redirects and the final destination (with number of hops and details of the full chain as well).
Dan Sharp, Founder of Screaming Frog
Step 4: Create a Strategy for Fixing
Now that you know how to find the redirecting internal links and what to do, it’s time to put together your strategy.
First, peruse all of the links in the list. Is there a pattern you can uncover?
For Credo, there was an obvious pattern that a couple of template files had not been updated to the new links. These two WordPress templates were causing hundreds of internal redirects.
I also found a few other patterns that, at scale, accounted for approximately 80% of the total internal redirects.
Beyond this, there were another 100 or so URLs where I simply needed to roll up my sleeves and do the dirty hard work to update the pages.
When you’re creating your strategy for fixing internal redirects, I recommend doing it in this order:
- Follow Pareto’s Principle and fix the patterns at their root. This could capture up to 70–80% of the instances with just a few changes.
- Work down the list of URLs, prioritizing them by Crawl Depth to capture the ones that are being hit the most often.
You will find Crawl Depth on the Internal tab as you scroll to the right. 1 means the page is one link removed from the homepage, 2 is two links, and so on. If the page has a 0, that means the link is on the homepage (if you began your crawl there).
As you go through this process, you may find that you’re frequently going back to the same URL to fix yet another internal link.
The way to solve this is to filter the Internal tab down to just that URL, click Outbound Links, and sort by Status Code. This way, you can fix all of the internally redirecting links from that page at the same time.
Step 5: Fix Internal Redirects
Now that you’ve put together your strategy and order of priority, it’s time to get to work.
Some changes may require development work or help, so prioritizing these with your developers is crucial. This is SEO hygiene work, so it’s not sexy work, but work with your developers to help them understand why this is a large issue. If you have project managers who are overseeing SEO bugs, work with them to get the work prioritized. This work is often not very intensive, but it can show big results if the problem is large enough.
I then like to set aside about a day to make the other updates where I can, whether in a CMS or elsewhere. This is a great excuse for getting full access to the CMS, or pushing eventually for a CMS to be used for you to be able to update these links.
Credo uses WordPress, so updating most of the internal links was relatively easy though time-consuming work.
Step 6: Recrawl
Once you’ve tackled as many of these issues as you can, you should recrawl your site to make sure that these issues are truly fixed. I’ve found times where the change didn’t take place, there was a cache that hadn’t been cleared, or a myriad of other reasons why the change didn’t take.
When you recrawl, you’re also able to find any new redirects that were caused or that you overlooked before because of the volume of changes needing to be made.
Rinse and repeat this process of crawl > prioritize > fix > verify fixes, and you’ll make substantial progress on this silent SEO killer.
Other Things to Watch For
As with anything with SEO or development, there are gotchas and things to watch out for when fixing internal redirects.
First, make sure that the redirect from the old URL to the new URL remains. I have seen developers be asked to update internal links, and while they are doing this task they remove the redirect from the old URL to the new. To illustrate, if /page-url/ links to /outbound-link/ which then redirects to /outbound-link-1/, you want /page-url/ to link to /outbound-link-1/ and /outbound-link/ to continue redirecting to /outbound-link-1/ in case there are external links to /outbound-link/ that you want to save and have count towards /outbound-link-1/.
Second, when you update URLs and thus internal redirects happen, you also need to make sure that XML and HTML sitemaps are updated to link directly to the new URL. Out-of-date XML sitemaps are another silent SEO killer!
Third, make sure that any new redirects put in place by developers to fix issues are not causing new redirect chains on your site. A fresh crawl will help surface these and you can prioritize accordingly.
Having SEO Issues?
If your website is seeing decreased SEO traffic, you’re not sure why, and you don’t have SEO knowledge, then it makes sense to have someone else diagnose the issues.
When you’re looking for SEO help, schedule a free consultation with our team of matching specialists to meet the right SEO providers fast.
